Introduction
A high level of visual acuity, especially for near vision, is a requirement in modern dentistry for clinical work. Using a magnifier to effectively magnify the area of interest is a typical approach to improve vision.1 It is well-established that the brain can see what the eyes can see; nevertheless, there's a lot more than that, which may be seen with magnification equipment. And optical magnifications have significantly expanded the scope of dentistry.2 Endodontics has progressed not only in terms of basic and clinical scientific knowledge, but also in terms of technical advancements. Because of the complexities of endodontic therapy, practitioners have always attempted to increase their field vision. Dental practice has been transformed with the use of magnification instruments. This is a step forward from traditional macrodentistry approaches to high-precision microdentistry.3
History4, 5
Magnification has been documented in Egypt for about 2,800 years, since the discovery of basic glass meniscus lenses. Magnification has been utilized in dentistry to increase visualisation for over a century. Anton Van Leeuwen invented the first compound lens microscope in 1694. The magnification was first used in dentistry in 1876. Dentists began experimenting with loupes to aid with precision dentistry in the 1950s, and this technique lasted until the late 1970s. Dr. Harvey Apothekar, a Massachusetts dentist, and Dr. Jako introduced extreme magnification into dentistry in the form of an operating microscope in 1978. The term "micro dentistry" was coined by Dr. Apothekar in 1980. Dr. Richard Rubinstein and Dr. Garry Carr began performing apical surgery using a medical-grade microscope in 1990. The Academy of Microscope Enhanced Dentistry was founded in the year 2002.
Magnification Devices
Magnifying glass
A magnifying glass is a double convex lens fixed in a frame with a handle, and it is one of the oldest instruments used to increase vision. On both sides, the lens is convex, meaning it is thicker in the middle. Light rays are bent towards the center of the lens while viewing objects, making the object appear larger than it is to the eye.6, 7
Loupes
Loupes are the other most widely used magnification devices; to magnify a picture, all loupes use convergent lenses. Loupes are made up of two monocular microscopes with side-by-side lenses that are positioned to concentrate on an object and create magnified pictures with stereoscopic qualities using convergent lens systems.6
Advantages of loupes5
Small in size, takes up little room, and is simple to use and store
There is no need for formal training.
The surgeon's role is unrestricted.
When very high magnification and illumination are not required, it is sometimes more practical than a microscope, especially in preliminary procedures.
There is very little upkeep required.
It is not as costly as a microscope.
Wider depth of field, longer working distances, and a bigger field of view are all advantages of prism telescopic loupes. Magnification ranges from 2.5x to 8x with these loupes. To boost illumination, they can embed coaxial, fibre optic lighting inside the lens element.
Disadvantages of loupes5
Loupes do not allow for a stereoscopic view, hence there are no depth senses (our ability to determine distances between objects and see the world in three dimensions.).
With loupes, magnification is only practical up to 5x. Microscopes with higher magnification are preferable.
Due to head movement, the image is not stable.
The lighting is not as bright as it is in a microscope.
Because of their great size and weight, higher magnification loupes are uncomfortable to wear on the nose or head.
The surgeon's eyes must be able to see the entire operating field. Long-term usage of ill-fitting loupes causes eye strain, weariness, and possibly vision abnormalities.
Accessories like auxiliary observation tubes, 35mm camera, TV camera or movie camera cannot be attached to capture the magnified field.
Types of loupes8
Single-lens Optical system,
A surgical telescope with a Galileian system configuration (two lens system)
A surgical telescope with a Keplarian system configuration (prism roof design that folds the path of light).
Single-lens optical system
A simple lens system consists of one object and one convex, positive, light converging lens. Light travels from the object and reaches the lens, which then focuses the light from the object to form an image of the object.
The "simple lens formula," U + D = V is used to calculate the distance of the image of the object from a lens, where: U is the diopter value of the divergence of light that is emanating from an object, and equals:100 cm. / the distance in centimeters that light travels from the object before it reaches the lens. D is the diopter value of the lens, a measure of how strongly the lens bends or refracts light. V is the total value of divergence (or convergence) of light after it emanates from the object, moves a specified distance through air to the lens, and passes through the lens.8
Disadvantages
Poor image resolution as compared to multi‑lens glass optics (telescopic loupes and microscopes)
Since single lens loupes provide a set working distance, the dentist may find the ergonomics incorrect. (2) A surgical telescope with a Galileian system configuration (two lens system)8
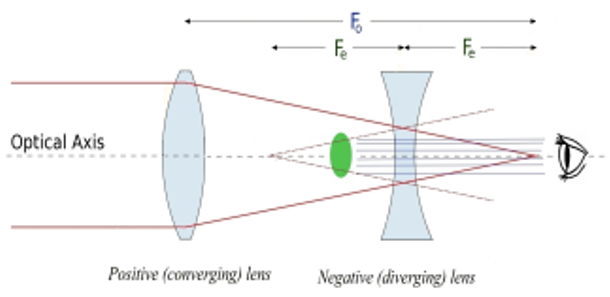
The Galilean telescope consists of two lenses; a concave eyepiece lens and a convex objective lens. The eyepiece lens is stronger (i.e. has a higher diopter value) than the objective lens.
Principle
Light from an object passes through the objective lens and then focuses at the secondary focal point of the objective lens. The primary focal point of the eyepiece lens is coincident with the secondary focal point of the objective lens, the secondary focal point of the objective lens is also located behind the eyepiece lens.8
Figure 3
Simplified lens schematic of a Galilean telescope with a convex objective lens and a concave eyepiece lens, where the exit pupil (green oval) originates inside of the telescope.
Advantages9
Higher level of magnification, improved depth of field and working distance along with high optical resolution
Disadvantages9
Galilean lens systems cannot offer magnification much greater than ×2.5 without incurring weight, size, and image resolution problems
(3) A surgical telescope with a Keplarian system configuration (prism roof design that folds the path of light)9
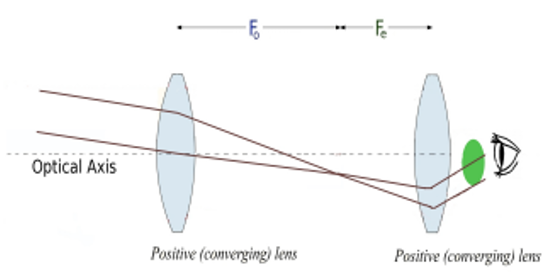
Keplerian loupes consist of two or more positive convex lenses. Keplerian telescope lenses are arranged such that the secondary focal point of the objective lens coincides with the primary focal point of the eyepiece lens.
The magnification produced, (according to the equation: M = - Fe / Fo) gives a negative magnification, meaning that the image formed by the two lenses is inverted 180 degrees. Consequently, Keplerian loupes require an extra component, called a prism, in order to make the inverted image upright.9
Disadvantages10
Figure 5
A 2.5x Galilean binocular loupe (lower left), and a 4x (top left) and a 6x (right) Keplerian binocular loupe shows the longer barrel length for higher magnification Keplerian binocular loupes, and the wider diameter objective lens of the Galilean binocular loupes.
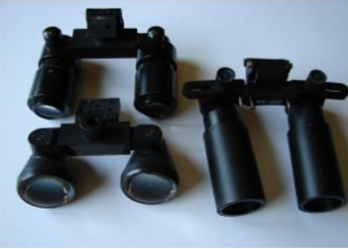
Well-designed loupes should enable a working posture of less than 25° of forward head posture.Loupes range in strength from about 2x to 5x and are available in 2 basic styles:8 front lens mount (flip-ups) and - fixed mounts, also called through- the-lens (TTL) 11
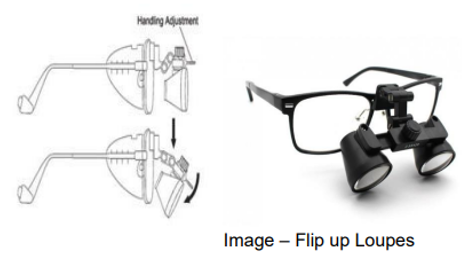
Flip up loupes
They have the scope mounted on a hinge mechanism in front of the carrier lens and can be flipped-up during a procedure.11
Advantages11
Can be worn at all times (simply flip out of the field of vision when necessary).
Other team members can use them.
Less likely to interfere with the use of intraoral or digital photography
Can be repaired faster than custom systems.
Better declination angle for head posture, better erganomics
Easily changeable eyeglass prescriptions by the clinician’s optician.
Disadvantage11
Flip-up loupes are sometimes heavier than fixed loupes and can also be knocked out of alignment
Because they are adjustable, the screws may get loose and striped causing them to flip down at inappropriate times.
Fixed mounts, also called through the lens (TTL)
They have the scope mounted directly into the carrier lens with a fixed declination angle. Since they are fixed, the loupes do not get knocked out of alignment.12
Disadvantages11
Expensive,
Difficult patient communication
If you need to leave the field of view, such as to speak with a patient or another team member, they must be removed.
Due to the limited declination angle, the helper may have to slightly bend his or her back and neck
If a vision prescription changes, the lenses must be returned to the manufacturer to be replaced.
Dental Operating Microscope
The introduction of Operating microscopes into dentistry in the last few years, particularly in endodontics, has revolutionized how endodontics is practiced worldwide.6
Components
The operating microscope consists of three primary components–
Supporting structure
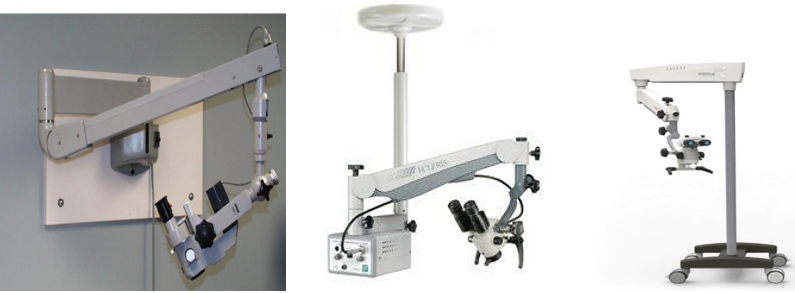
The microscope must be stable while in use while also being movable with ease and remarkable precision, especially when used at high power. The supporting framework can be installed on the floor, the ceiling, or the wall. The stability of the arrangement improves as the distance between the fixation point and the body of the microscope decreases. The floor mount is preferable in clinical environments with high ceilings or far walls.13
The body of the microscope
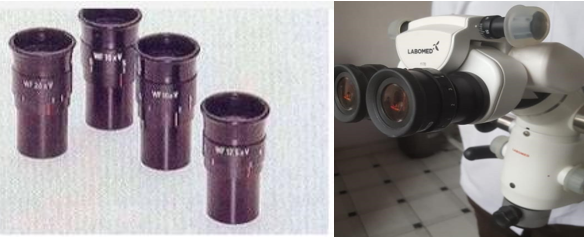
The entire magnification is done via eyepieces. They come in a variety of strengths, ranging from 6.3X to 20X; the most common are 10X and 12.5X.
Endodontic procedures are typically performed at magnifications ranging from 2.5X (access) to 20X (exploration, surgery, etc.)10 Periodontal microsurgeries are typically performed at magnifications ranging from 10X to 20X, dental technology is typically performed at magnifications ranging from 10X to 20X, and restorative dentistry is typically performed at magnifications ranging from 2.5X to 19X.
The actual stages and magnification range vary depending on the type of microscope utilized and the components used.
The total magnification (TM) of a microscope is determined by a combination of the four variables: Focal length of binocular (FLB)
Focal length of objective lens (FLOL ;
Eyepiece power (EP)
Magnification factor of the changer (MF
The typical microscope can be characterized by the following formula:13
TM = (FLB/FLOL) x EP x MF For example:
Binocular focal length = 125mm
Objective lens focal length = 250 mm
Eyepiece magnification = 10x
Magnification factor = 0.5
TOTAL MAGNIFICATION = 125/250 x 10 x 0.5 =2.5x.
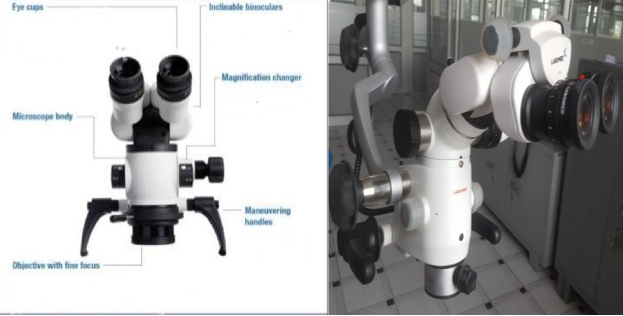
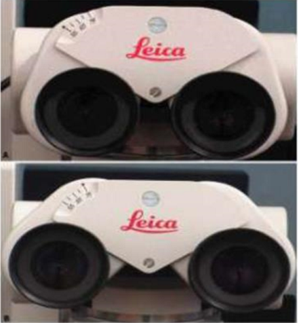
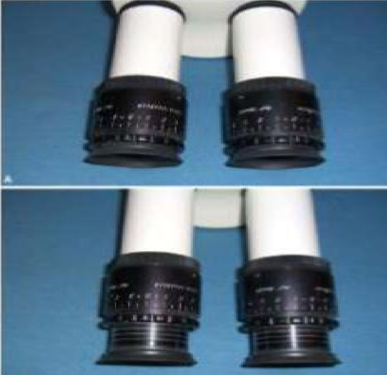
A rubber cup at the end of each eyepiece can be lowered for professionals who wear spectacles. Diopter adjustments are also available on eyepieces.13 The binoculars hold the eyepieces and allow the interpupillary distance to be adjusted; they are aligned manually or with a little knob until the two diverging circles of light unite to provide a single focus.
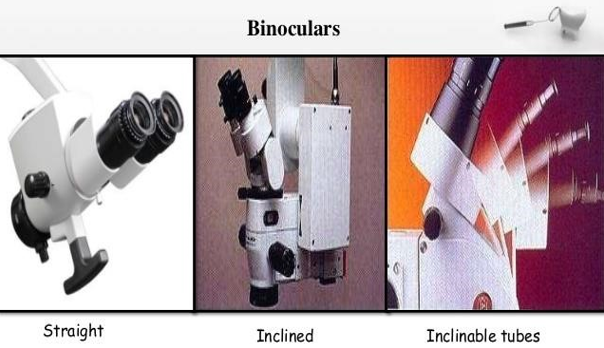
Straight, inclined, or inclinable tubes are offered in binoculars.
Straight tubes are commonly used in otology and are unsuitable for dental application.
To allow the physician to adopt a comfortable working position, inclined or inclinable tubes are suggested. Inclined tubes are set at a 45° angle to the microscope's line of sight; inclinable tubes can be adjusted indefinitely.2
Magnification changers are available as 3-, 5-, or 6-step manual changers, or a powerzoom changer. They consist of lenses mounted on a turret that is connected to a dial located on the side of the microscope. The magnification is altered by rotating the dial.2
Light source
The light source is one of the most important features of an operating microscope. The light source is generally powered by a 100- to 150-watt halogen light bulb that is connected to the microscope with a high efficiency fiber optic cable. The light passes through a condensing lens, a series of prisms, and then through the objective lens to the surgical site. The intensity of light is controlled by a rheostat.
Accessories13
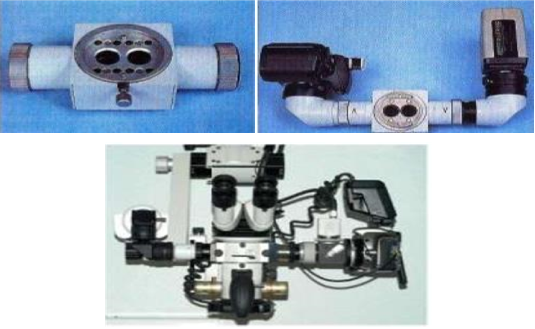
Beam splitter
A beam splitter can be positioned between the binoculars and the magnification changer to redirect a particular amount of the light from the eyepiece towards the accessories. In most cases, the beam is split 50:50. (I e, half of the light is always available to the operator). The beam splitter can be connected to a picture or video adapter. The video camera is a handy feature that serves two purposes: it allows the assistants to accurately observe the procedure and assist efficiently, and it may also be utilised for documentation via video prints or recordings.2
2 — Pistol grip or bicycle-style handles can be attached to the bottom of the microscope to facilitate movement of the microscope during surgery14
Uses of dental operating microscope
Better Visualization: The surgical microscope has been used to enhance visibility during dental procedures.4
Diagnosis: The microscope is an excellent instrument to detect microfractures that cannot be seen by the naked eye or by loupes. Under 16x to 24x magnification and focused light, any microfracture can be easily detected.4
Identification and removing of denticles: This type of calcification is also fairly common, and it can block the canal opening or even prevent further instrumentation. A dental operating microscope can be used to locate and negotiate denticles.4
Locating hidden canals: The most important utility of the microscope in nonsurgical endodontics is locating hidden canals.4
In open apex: Modern apexification therapies necessitate specialised treatment techniques and materials, which can be aided by dental microscope manipulation.15
Management of calcified canals: The calcified canal in the pulp chamber is not visible with normal vision or low-power loupes. The contrast in color and texture between the calcified canal and the remaining dentin can easily be noticed when examined under a microscope at high magnification.4
Perforation repair: When a perforation occurs, the microscope is the most important tool for locating and assessing the injured area. The results of a thorough inspection will serve as the foundation for preparing the perforation repair.4
Removal of fractured post: The enhanced vision with magnification and illumination from a microscope allows endodontics to observe the most coronal aspect of fractured post and to remove them without any major loss of tooth structure and perforation, the prognosis for preservation of tooth is good.15
Retrieval of broken files: The microscope is essential to guide the clinician to retrieve the broken files while minimizing the damage to the surrounding dentin.13
Final examination of the canal preparation: A little amount of sodium hypochlorite, a common irrigation solution, is put into the canal and carefully studied under the microscope at high magnification. There is still leftover pulp tissue in the canal if bubbles are flowing from the prepared canal. In short, the canal requires additional cleaning.13
Disadvantages13
High magnification: There is a tendency to use a magnification which is too high. A fundamental optical principle is that the higher the magnification, the narrower the field of version, and the smaller the depth of the field. This concept is important because when higher magnification is used, surgery becomes more difficult, especially when it involves considerable movements.
Changing technique: There is consistent failure by operators to emphasize that the advantage of the operating microscope are not only in research and new operations or new instrumentation, but in the ability to perform conventional periapical surgery with greater precision and accuracy.
Lack of practice: When using an operating microscope, the operator must transition from "mobile" to "static" mode. A new level of coordination between the operator's eyes and hands must be acquired, an adjustment that can only be achieved via regular practise with modest surgical procedures.
Ergonomics
Following the installation of the operating microscope in the dental office, the operatory must be ergonomically organised. In nonsurgical endodontics, this is done by an assistant who sits in front of the dentist, whereas in surgical endodontics, it is done by a second assistant who stands up to the right of the operator and monitors the surgical procedure. During the surgery, the first helper must keep the suction under control so that the procedure does not become obstructed by bleeding.15
Positioning the microscope13
In chronological order, the preparation of the microscope involves the following maneuvers:
Operator positioning
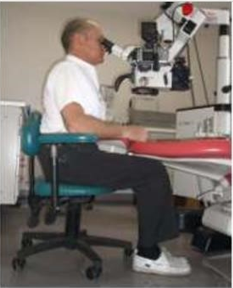
The correct operator position for nearly all endodontic procedures is at the 11 or 12 O’clock position. Positions other than the 11 or 12 o’clock position (for example 9 o’clock) may seem more comfortable when first learning to use a microscope, but as greater skills are acquired, changing to other positions rarely serves any purpose.
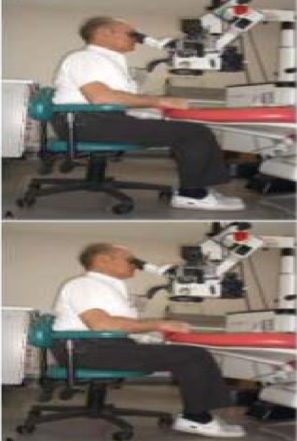
The operator should adjust the seating position so that the hips are 90 degrees to the floor, the knees are 90 degrees to the hips and the forearms are 90 degrees to the upper arms. The operator forearms should lie comfortably on the armrest of the operator’s chair and his or her feet should be placed flat on the floor. The back should be in a neutral position, erect, perpendicular to the floor, with the natural lordosis of the back being supported by the lumbar support of the chair, with the eyepiece inclined so that the head and neck can be held at an angle that can be comfortably be sustained. This position is maintained regardless of the arch or quadrant being worked on. It is the patient who is moved to accommodate this position. The trapezius, sternocleidomastoid, and erector spine muscles of the neck and back are completely at rest in this position.
A common problem in establishing proper posture in microscopic dentistry results from chair headrests that position the patient’s head too far from the doctor’s waist. Most dental chairs that have too long a headrest are best modified by simply removing the headrest and placing a soft pillow in its place.
Rough position of the patient
The patient is placed in the trendelenberg position and the chair is raised until the patient is in focus. The main advantage of the Zeiss Pro-Ergo microscope is that the patient height can be varied to fit the most comfortable position because the focal length of the microscope can be optically changed simple by activating the zoom control. This ability to easily change the focal length of the lens makes patient positioning to the ideal height possible on nearly all patients.
Positioning of the microscope and fine focus
After turning on the light of the microscope, the microscope should be maneuvered so that the circle of light shines on the working area. Knowing the focal length of the objective lens, the operator moves the body of the microscope approximately to the working distance and then, looking through the eyepiece, moves the microscope up and down until the working area comes into focus. During this maneuver, the fine focus device of the objective lens should be in an intermediate position in order to allow a wide range (20 mm) during the fine focusing of the operative field. The inclinable eyepiece is now adjusted so that the operator’s head and spine can maintain a comfortable position with the working area in focus.
Adjustment of the inter pupillary distance
Looking through the binocular, each eye sees a small circle of light. The inter pupillary distance should be now adjusted by taking the two halves of the binocular head of the microscope , and moving them apart and then together, until the two circles are combined and only one illuminated circle is seen. With some microscopes, this maneuver is made moving a knob located on the binocular. Adjustable rubber cups extend from the ends of the eyepieces. Those who wear glasses should have the cups in the lowered position and those who work without glasses should work with the cups in the raised position.
Fine positioning of the patient
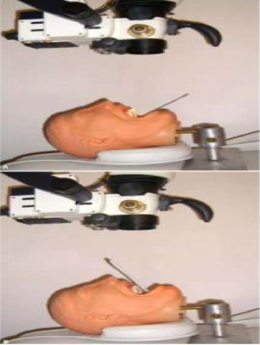
To put the patient in the final position, it is now required to make little motions with the back of the dental chair. Keeping this in mind, it's important to remember that in nonsurgical endodontics, 100% of the job is done through indirect view through the mirror at the microscope. As a result, the patient's final position is determined by the angle at which the microscope's light must be aimed in order to illuminate the root canal where the physician is working. The patient must be positioned to allow the light to penetrate the root canal to be treated if the light beam is perpendicular to the floor and the mirror is at 45° to the light To put it another way, the root canal of the tooth to be treated must be at 90 degrees to the laser beam, while the mirror is at a 45 degree angle. As a result, when working in a maxillary root canal, the patient should be horizontal and parallel to the floor; when working in a mandibular root canal, the patient should be in a "Trendelenburg" posture, which means the head should be somewhat lowered to the pelvis.
Parfocal adjustment
Individually adjust the eyepieces so that the focused view of the working area remains sharp while the magnification level is altered. This is known as parfocaling, and it's crucial to get it right, especially if the assistant scope or documentation accessories are attached to the microscope. In fact, it is required that while the operator's working area is in focus, the helper, the video camera, or the still camera be in focus as well.
The following are the steps to take while making a parfocal adjustment:
Place the microscope on top of a level, stable surface
2 Make a "X" on a piece of white paper with a pen or pencil to act as a focus target, and place it within the microscope's light field.
Fine focus adjustment
Changing the focal area inside the root canal from one plane to another is accomplished by elevating the entire back of the dental chair a few millimetres with the operator's knee. Working inside a root canal in this manner allows the area in focus to be altered from the orifice level to the deepest part of the canal itself without the need of hands or moving the hands away from the working area. .(2)
Endoscope
The term endoscopy is derived from the Greek language and is literally translated as endon (within) and skopion (to see), hence the meaning, “to see within.”
Rod lens endoscope
In 1979, the first use of a rod lens endoscope in endodontics was documented in the literature. The use of a rod lens endoscope as a magnification equipment for conventional and surgical endodontic operations was documented in the literature in 1996.16
The early endoscopes were large and somewhat cumbersome, and certain angulations, (beyond 30º) produced a fish-eye image. Recent advances have produced scopes with smaller lens diameters, ability to use 70 and 30-degree angulations and no fish-eye effect.
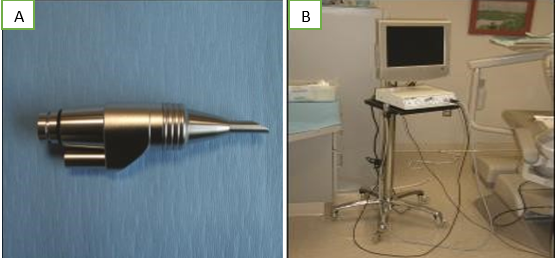
The rodlens endoscope is made up of rods of glass work injunction with a camera, light source and a monitor. The option of a digital recorder (either streaming video or still capture) can be added to the system for documentation of a procedure 16
Advantages
The rod lens endoscope allows clinicians greater magnification than what can be achieved with loupes or a microscope with the optical resolution comparable to the microscope and loupes.16
The ability to view a surgical treatment field in a non fixed field of vision.16
The rod lens endoscope offers the ability to view a treatment field at various angles and distances without losing depth of field and focus.
Diagnosis: The dental endoscope viewing system (Dental View) is currently available as a diagnostic and therapeutic adjunct to the restorative dentist, endodontist, periodontist, oral pathologist, oral surgeon, otolaryngologist, and dental hygienist.17
Transillumination: In cases of tooth infraction, the endoscope can provide transillumination as a diagnostic aid.17
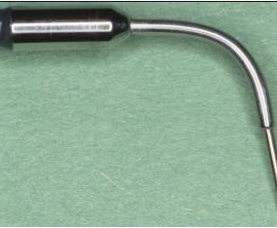
Apical Surgery: The curvature of the hand-piece enables the practitioner to visualize the hidden parts of the cavity preparation, and to inspect for cracks and root fractures in the apical retrograde preparation.17
Disadvantages
1) While an endoscope can be used to visualise traditional endodontic treatment, it is cumbersome and difficult to maintain a fixed field of vision when compared to a microscope.16
The traditional endoscope used in medical procedures consists of rigid glass rods and can be used in apical surgery and non-surgical endodontics.
The flexible and semi-flexible endoscopes can be very valuable addition to the armamentarium. The endoscope is flexible due to special nitinol coating. The optical part which is 0.9 mm of diameter, is a piece of equipment that enables the practitioner a magnification of up to 20X with clear picture with wide angle.17
Figure 19
a: 2.7mm lens diameter, a 70º angulation, and a 3 cm long rod-lens endoscope b: 4mm lens diameter, a 30º angulation a 4 cm long rod-lens endoscope
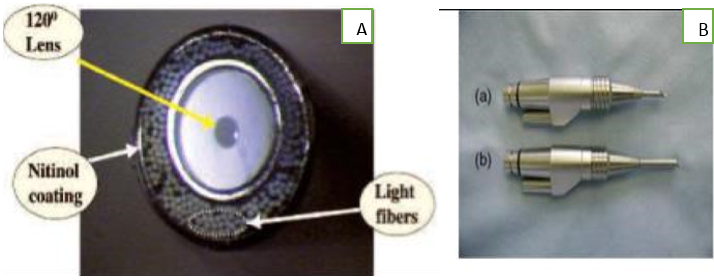
A 2.7mm lens diameter, a 70º angulation, and a 3 cm long rod-lens are recommended for surgical endodontic visualization and a 4mm lens diameter, a 30º angulation, a 4 cm long rod-lens are recommended for non-surgical visualization through an occlusal access opening. (Figure a & b)
Orascope16, 17, 18
Limited intracanal visualization was the catalyst for fiberoptic development. Ten years ago, fiber optic imaging was ergonomic yet suffered from poor imaging quality. Today a unique lens design combined with a digital image processing system in the camera allows fiber optics to obtain excellent intra and extracanalvisualization
An orascope is a fiber optic endoscope and like the rodlens endoscope works injunction with a camera, light source and a monitor.
Fiber optics are made of plastics, and therefore, are small, lightweight, and flexible. It is important to note that the image quality from fiber optic magnification has a direct correlation to the number of fibers and size of the lens used. The fiber optic endoscope is designed for intracanal visualization.
The orascope has a 0.8 mm tip diameter, 0° lens and the working portion is 15 mm in length.
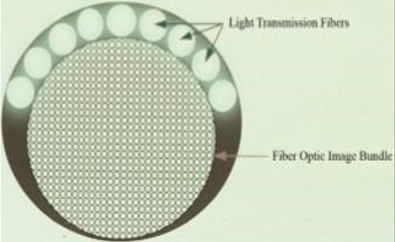
The orascope is made up of 10,000 parallel visual fibers. Each visual fiber is between 3.7 microns and 5.0 microns in diameter. A ring of much larger light transmitting fibers surrounds the visual fibers for illumination of a treatment field16, 17
Both an orascope and an endoscope works in conjunction with a camera, light source and a monitor. The option of a printer or a digital recorder can be added to the system for the documentation procedure.17
Fiberoptic development was sparked by the lack of intracanal visibility. Fiber optics are small, lightweight, and flexible because they are comprised of plastic. It's worth noting that the number of fibres and lens size utilised have a direct relationship with image quality when using fibre optic magnification. Intracanal visualisation is the goal of the fibre optic endoscope.17
Conclusion
Optical magnification has broadened dentistry's horizons, not just in Conservative dentistry and Endodontics, but also in Prosthodontics, Implant therapy, Periodontic treatment, and every other part of dentistry. Increased precision in cavity preparations, better vision of tiny details and imperfections, more precise execution of all techniques, better patient treatments, fewer iatrogenic occurrences, less removal of sound tooth structure, better communication between clinicians and patients, and improved documentation of each treatment case are the most significant advantages of using an operating microscope. The dentist can see more clearly with higher magnification. Both the practitioner and the patient benefit from this.


